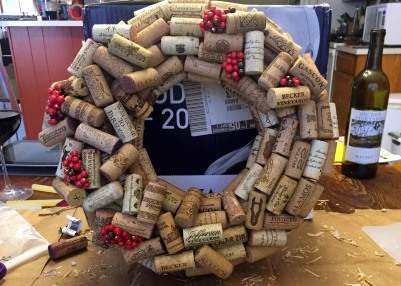
It’s the weekend after Thanksgiving, and while many people are out battling each other over the latest and greatest children’s toy, I am decorating for Christmas. Growing up, the third Friday in November was always about setting up the Christmas tree, decking the mantel with garland and stockings, and hanging Christmas lights along the roof. The third Friday of November was the start of Christmas season.
This year, I’m really excited to hang my first Christmas wreath on the front door. I know, how is it possible I’ve never had a Christmas Wreath?! As someone who loves adding meaningful personal details when decorating, I’ve always shied away from store bought wreathes so I’ve never had one for our front door. This year, though, as I was unpacking all of our moving boxes, I realized I had a lot of wine corks, and what better way to create a personalized wreath than to use wine corks from all the bottles of wine I’ve shared with friends and family.
 After a little research, and dozens of wine cork wreath tutorials, I finally settled on a DIY tutorial from Save-on-Crafts as my base inspiration. By adding some Christmas-like berries and a greenery center piece, I was able to take the simple wreath to the next level.
This is a simple, inexpensive craft that cost me about $15 in supplies – not including all the wine I had to drink. If you want to make your own wreath this year, but are short on corks, make friends with your local bartenders and ask them to hold corks for you and ask wineries or grocery store tasting booths (like at Trader Joe’s) if they have any they can save for you.
How To Make Your Own Wine Cork Christmas Wreath
Materials
12-inch straw wreath form
floral wire or string
approximately 200 wine corks*
5-6 sprigs of faux berries
greenery and decorations for center piece
hot glue gun
high-temp glue sticks, at least 8
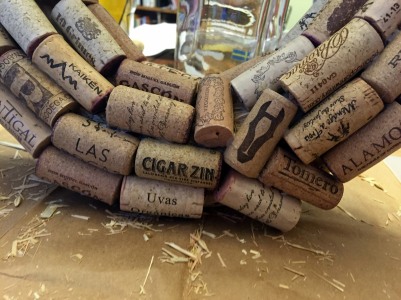
First, sort through your corks and set aside any that have special meaning for you. For example, I made sure to set aside at least one cork from each Virginia and Texas winery I’ve visited as well as any corks I found particularly pretty or touching. These will be the top level of your wreath and the corks people will see when they look at the cork. Any corks you have lots of or aren’t inspiring can form the bottom, hidden layer.
Next, tie a string or floral wire to the wreath for hanging the finished
product. I tied two peices of floral wire around the wreath, about 2 inches apart, and then connected them with a third wire, which would support the wreath.

Start by gluing the corks along the inside of the wreath form in a straight line. You will almost certainly come to a point near the end where the corks will not line up as you’d likeand you will have repress the OCD and just make it work. I happened to have a few abnormally short corks and I squeezed one of those into that space, you could also trim another cork smaller, or just lay them out slightly askew.
Remember to leave the back of the wreath empty so that it will lie flat against the wall or door.
Continue with the first layer of corks, lining them up flat against the wreath until it is mostly covered. You want to line these up as closely as possible to minimize areas of visible straw.
Begin layering the second level of corks, arranging to cover gaps in the first layer of corks. This is where you get to start being artistic with your arrangement.
While creating the second layer of corks, you should start arranging small bunches of berries throughout the layer. I used inexpensive styrofoam berry picks from Michael’s Christmas collection, but the exact type of berries used is totally up to you and what you feel most comfortable using.
At this point you are going to start wanting to think about what and where you want the wreath’s center piece. I decided to place mine slightly above center on the right side of the wreath.
I began by arranging the main piece of the greenery – a Christmas pick with a red bird I bought at Michael’s Craft – and attaching it with floral wire and a little hot glue. I then cut small branches from basic greenery picks and used those to fill in the center piece.
Once the center piece was arranged the way I wanted, I finished attached the last of my wine corks and berries. I let it sit for a few days and then double checked my corks to make sure they were all secure. Then it is ready to hang on your front door or anywhere else you might like to put it!


Pingback: 10 Ghirlande Natalizie con Tappi di Sughero | PianetaBambini.it
Pingback: Spice Up Your Home for Christmas With These 6 DIY Decoration Projects - DIY Lifehackers
Pingback: 8 Modern Christmas Decorating Ideas | Angelica Angeli
Pingback: 8 Ghirlande Natalizie con Tappi di Sughero | PianetaBambini.it
Pingback: Last Minute Christmas Gifts: Wine - The Versatile Gent
You gave me a chuckle about the cost of the wreath…or should I say the wine that made it all possible. Nice job on the wreath…everyone that passes you home will want to make friends with you after seeing it. 😀
Thanks Karen!
I don’t know that I want to know how much the wreath *really* cost me 😉 I did get some corks at the end from a local bar, so that helped. I was at Goodwill the other day and saw a bag of corks for $5. So there are definitely cheaper – if less enjoyable – ways to get corks.
I like the idea of asking a bar to save you some. That would cut down on the cost but alas also the fun.
Your wreath turned out really nice! It should last you for many holidays. It is unique and very well done-a conversation starter for sure!
Thank you Sarah! I am really excited about it and living in Austin, where there aren’t many winter elements, it won’t have to weather many storms either. Otherwise, I might have kept it inside.