
 I don’t think I could even begin to explain the struggles that have prevented me from contributing to Emilie and my beloved Cork and Spoon. For those that have stuck with us through the years, even this past year of silence, you know I usually begin my own creative process with what is going on in my life…you know, where I am emotionally and all. Over the last three years, I basically shut down inside and it wasn’t until recently that both I and my shrink discovered the huge why that had been hiding in the shadows of all the whats (two words: narcissistic sociopath. Sigh.). Yet that fresh wave of pain earlier this month seems to have begun the washing away of the walls that had risen around me. The fresh air finding its way through the cracks is feeding that ember of creativity I’ve been trying so hard to re-light for so long. And boy did that ember got quite a wind of fresh air when I heard that October was National Popcorn Popping Month and given a challenge. .
So what was that challenge, you ask? Well, dress up my popcorn for Halloween of course. Now how fun does that sound? Popcorn is actually a big thing in my office. Someone usually has a bag of SkinnyPoP stashed away in their cube lol. Various health issues have led to a number of my co-workers restricted to gluten and dairy free diets, so popcorn is often the snack of choice. A Halloween popcorn snack was perfect since it was naturally gluten free, which meant I could share it with everyone at the office if I made sure to keep it dairy free as well.
So  how could I dress up my Halloween popcorn in a fund and new way?
According to Pinterest, popular Halloween themed popcorn treats included bowls of popcorn colored slime green with either melted candy or food coloring, popcorn neatly nestled in cute Halloween themed bags, or the ever popular popcorn stuffed latex glove decorated with witchy finger tips and spider jewelry or Frankenstein stitches. Well, we all know how I don’t like to do what everyone else is doing. I felt like my little ember of creativity was losing its spark.
Then inspiration hit just in the nick of time. I was perusing pins under “Halloween Food” and came across a pin of a cake pop decorated as the witchs’ spell book from Hocus Pocus and next to it a pin of a Harry Potter butterbeer recipe. Harry Potter, perfect! Especially with all the new releases that are taking place between Broadway’s “Harry Potter and the Cursed Child” and the upcoming “Fantastical Beasts and Where to Find Them”. Oh, and of course because Emilie and I are huge Potterheads. I don’t know about Emilie, but I’m sure the Gryffindor scarf my sister knitted for me years ago is packed away with the rest of my winter wardrobe. What if I molded the popcorn into a rectangle and decorated it as the Monster Book of Monsters?
 However, inspiration wasn’t done with me yet.
As I searched Pinterest for ” Harry Potter Monster Book of Monsters” cakes to get an idea of techniques and supplies I might need, a lone non-Monster Book of Monsters pin appeared…If you’ve ever scoured Pinterest for Harry Potter themed food, you’ve probably seen it too: Ferrero Rocher chocolate balls dressed up with wings to make them Golden Snitches. Hmmmm…
…Why not make Golden Snitches out of popcorn balls?
Emilie agreed with my brilliance as it hit the Halloween theme two fold: a classic Halloween party treat (popcorn balls) and a favorite modern-era story filled with Halloween’s favorite archetypes (magic, witches, wizards, creatures, monsters).
Now, I must admit. I had never made popcorn balls before in my life. I knew I needed  popcorn and something to make it stick in a ball shape. The majority of popcorn ball recipes called for a caramely simple syrup…this meant butter and so did not meet my criteria for a dairy free treat. With not too much wondering, I decided why not go the Rice Krispies treat route and use melted marshmallows and coconut oil instead?
BTW, I’ve never made Rice Krispies treats either. I was in for a kitchen adventure to be sure.
Everything started out great. Calm, relaxing, easy peasy…melt the marshmallows, coat the popcorn in the gooey marshmallow syrup, let it cool…then shape into balls, right?
Ummm, yeah. I did not realize just how messy this process was going to get or how  frustrating for this first time popcorn baller. For the life of me, I could not get the popcorn to stay in a ball shape. After about an hour of frustration, I had to take a pause and analyze the situation.
My initial instinct was that I had used too much water for the marshmallowy simple syrup. Too late to fix that; I’d already poured it all over the popcorn and a new batch would require a grocery store run for another bag of popcorn. I also noted how after forming the popcorn into shape, the popcorn would stick to my hands as I released them into their treat cups. For this I had two solutions. First, more frequent spritzes of olive oil on my hands. Second, a olive oil spritzed ice cream scoop helped create a more compact ball that kept its shape better than when I molded them with my hands.
Oh thank goodness when fixes work!
After I had formed all the popcorn into round balls, I placed them in the fridge for some extra firming while I moved onto the final touches that would make them Golden Snitches.
For the color, I tested out two options: gold decorator’s sugar and gold food spray. I really thought the spray would do the trick, but Emilie’s idea of the sugar came out as the best approach to dress these treats in gold. Honestly, you don’t need the gold food spray at all, just the sugar, although I used the spray to get into the nooks and crannies the sugar wouldn’t go.
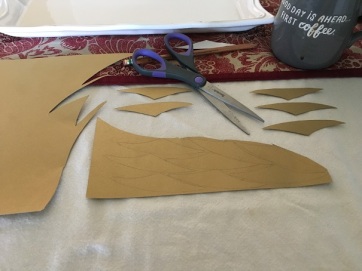
 Lastly, I tried out two materials for the wings (gold cardstock and gold vellum) and two wing templates (easily found using Pinterest or your favorite search engine’s image search). I preferred the sharper lined wings of the template I chose and while vellum may have worked for the Ferrero Rocher golden snitches, the material was far too floppy to stick into the popcorn balls without any additional support. The cardstock, on the other hand, worked absolutely fine with only a few issues in “too gooey” areas of the popcorn balls.
When I had finally dressed my popcorn into Golden Snitches, I was so excited to share them with everyone.

After all, there’s nothing like seeing something you envisioned in your mind’s eye take shape before you and become a (tasty) reality.
Happy Halloween, guys!
~Ruth
*Disclaimer: Neither Emilie or I received any form of compensation from SkinnyPoP. This blog contains our own opinions and experiences and all ingredients, supplies, and props were procured with our own, personal funds.

Golden Snitch Popcorn Balls
makes 20-24 popcorn balls depending on the diameter of the popcorn balls.
Ingredients

- 1 4.4 ounce bag SkinnyPoP Original Popcorn (appx 4 cups popped popcorn)
- 1/4 cup coconut oil
- 1/2 cup granulated sugar
- 1/4 cup light corn syrup
- 1/4 cup water
- 5 ounces mini marshmallows (about 1/2 a package)
- Gold decorators sugar or sprinkles
- Optional: gold food color spray
Directions
- Pour popcorn into a large cake pan or casserole dish. Make sure it is big and deep enough for you to toss and coat the popcorn easily. Set aside.
- Melt coconut oil in a medium saucepan over medium heat.
- After coconut oil is melted, add corn syrup, granulated sugar, and water to the sauce pan. Raise head to medium high.

- Stir simple syrup mixture until the sugar has dissolved thoroughly.
- Add marshmallows to simple syrup, stirring constantly until completed melted.

- Pour marshmallow simple syrup over the popcorn and toss with a spatula or spoon. Ensure the popcorn is evenly coated in the marshmallow syrup. Allow to cool a few minutes until the mixture is cool enough to handle.

- Line a baking sheet with wax or parchment paper. Spritz with olive oil or your favorite cooking spray.
- Spray hands with olive oil. Optional: If using an ice cream scoop, also spray with olive oil.
- Either with your hands or using an ice cream scoop, form marshmallow coated popcorn into balls about 1.5 to 2 inches in diameter. If using the ice cream scoop, really push the popcorn into scoop with your free hand to mold it into shape. As needed, re-apply olive oil to prevent popcorn from sticking to your hand or the scoop and loosing its shape.

- Once all popcorn balls are formed, sprinkle with gold sugar, ensuring to approach from multiple angles for the best coverage. Optional: After finished with the sugar, finish up with a gold food color spray.

- Store popcorn balls in the refrigerator to help firm the marshmallow coating while you prepare the Golden Snitch wings.
- Hand draw or use a downloaded template to trace desired pairs of wings on a sheet of gold cardstock. Cut wings out and set aside for when ready to finish the Golden Snitches.
- When ready for the final touches, transfer the popcorn balls from the baking sheet to gold colored baking cups.

- Carefully fit wings into the sides of the popcorn balls.

- Keep refrigerated in an airtight container until ready to serve in order to ensure popcorn balls maintain their shape.

 Wow! I can’t believe a season actually caught up with the calendar on time. The fall equinox (for those of us up here in the Northern Hemisphere anyway) occurred about three weeks ago. Usually the weather stays warm for a couple of weeks, but BAM! Almost immediately the temperatures dropped from the upper 90s to the cozy 70s. Figures that just as I get my AC fixed the weather would turn and a new HVAC issue with the heating pops up. Oh dear.
 flavored and scented and how kitchens begin smelling of warm spices from chili to cinnamon. Or maybe I just like fall so much because I’m a fall baby.
 It’ll probably disappear fast from your tables, too! It has all the right fall stuff after all: warm spices with just enough heat, soothing creaminess to offset the heat, and filling late summer and early fall veggies, most of which you can still find at the farmer’s market.


 Well, last week the fall season began, the season of change, letting go, and a reminder that nothing is permanent. For myself, as I say good-bye to summer, I am also saying good-bye to a 10 year relationship that ended on a very bad note and letting go of the pain that has accompanied it.
 background I know that everything has meaning, but only because we attach that meaning to it. That said, we can also remove and change those meanings, which is why I spent most of my summer exorcising demons from the places and things I had shared with Shawn over the past decade. Of course some things are more easily taken care of (i.e. burning pictures, donating left behind clothing), while others, like places, are harder (I’m probably the only person that hates Charleston, SC). I thought I had cleared them all out of the shadows until the other week.
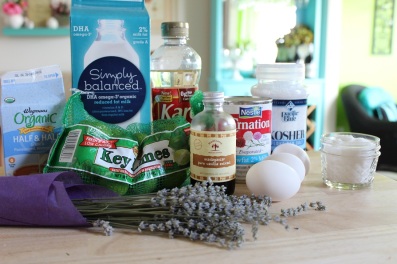
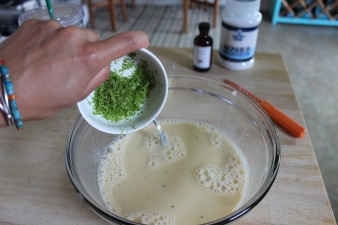
 I had joined my family in Orlando and one non-Disney day, while my nieces napped, I was able to escape for a couple of hours. I found myself a nice restaurant, buying myself a tasty, light lunch and a fun flight of wine. Being on vacation, of course I said yes to dessert. When my server brought out a tray of tall shot glasses filled with sweet delights, I asked her for her recommendation.She told me the key lime pie trifle was her absolute favorite.
 taking a deep breath and adding them to my shopping cart. Of course the limes hadn’t hurt me, Shawn had. They were just lil ol’ limes. I had to do something nice with them.


 Well, it looks like the New Year has arrived. Hello, 2016. You got here kind of fast, didn’t you? What do you have in store for me this time around? I can ponder these questions right now, because I have been on and off ill since Thanksgiving. Not much more you can do when you’re buried under a mountain of tissues…I mean blankets…yeah no, tissues (eeewwww). Between the stress of the holidays and the stress of being on the road for work almost the entire month of December, it is no wonder this bug got a hold and just refuses to let go. It’s been around so long, that even my mom and sister are like, ummm, maybe you should see a doctor, Ruth?? Did I mention I’ve been on the road for almost a month? Bah! However, cocktails of Benadryl, Robitussin, NyQuil, and Advil only work for so long, which led me to finally acquiesce to my sister’s advice of making her favorite homeopathic cold and flu remedy, which I’ll be sharing my version of with you today.
 years arguing with this military and then tri-care physicians about. Physical therapy, shots, pills, pain management…over and over and over until he finally got a doctor that listened and heard what he was saying. Right now my dad is in a similar boat. For years he has been complaining about back and hip pain and accepting the pain killers offered by his doctors…all the while I am telling him to ask them what is causing the pain! Right before Thanksgiving he got an MRI…and now it looks like he is going to need both hip and back surgery. SMH.
 drop it as quickly as I could…all that did was depress me and cause more weight gain. Ineasted what I need to do is make better choices for myself, such as whether to pick up a box of Popeye’s fried chicken on my home from a stressful day work or hit the grocery store for some chicken breasts and veggies. Also, Emilie, our friend Gil, and I have been talking about running the New Orleans Rock n Roll half marathon since we met up in Austin back in February (Well they’re doing the 10K and leaving me to do the half on my own lol). I was supposed to start training Thanksgiving weekend…but you already read about how I’ve been sick and on the road…now I have a mere nine weeks to train instead of my originaly planned 14! I can do it, it’s not my first rodeo after all, but I need to understand that I may not achieve a PR (Personal Record). Instead I need to re-focus my goal and just enjoy the race…it’s supposed to be awesome with great crowds and rockin’ music…it’s New Orleans, c’mon!

 Why Garlic: Raw Garlic has been used to treat a number of illnesses and disease over the centuries. In this remedy, it’s anti-microbial and antioxidant properties are harnessed to give your immune system a needed boost.
 Why Ginger: Besides its well known properties have easing queasy tummies, ginger also helps with reducing inflammation and improves the body’s ability to absorb needed nutrients. Not to mention the warmth of the spice is pretty comforting IMO.
 Why Jalapeño: Did you know peppers have more Vitamin C than oranges? I didn’t either until my cousin told me about it and I went researching. Also, the spice of the capsaicin in hot peppers not only help clear up your sinuses (yeah, wow, did it) but this compound is also associated with reducing muscle and joint aches/pain.
 Why Lemon: Yes, Vitamin C, but also its antioxidants,bioflavonoids, which researchers believe are responsible for the health benefits of lemon such as reducing inflammation and improving blood circulation.
  Why Apple Cider Vinegar: Though mostly a folk remedy with little scientific research to back it up, this ingredient strangely enough alkalizes our bodies. Germs apparently prefer to stick around when our bodies are more acidic. Interesting…
 Why Honey: Well we all know how this thick stuff helps coat our throats and ease the soreness of a raw and swollen throat, but apparently honey helps keep us hydrated and loosens up congestion when combined with lemon juice or hot water. Also, honey is anti-microbial and contains antioxidants.


