Category Archives: Recipes

Jalapeño Popper White Chicken Chili

jalapeno-popper-white-chili_2418Wow! I can’t believe a season actually caught up with the calendar on time.  The fall equinox (for those of us up here in the Northern Hemisphere anyway) occurred about three weeks ago.  Usually the weather stays warm for a couple of weeks, but BAM! Almost immediately the temperatures dropped from the upper 90s to the cozy 70s. Figures that just as I get my AC fixed the weather would turn and a new HVAC issue with the heating pops up. Oh dear.

Oh, but lovely fall! It’s my favorite season. I love the cool, but still comfortable weather, the cozy scent given off by the wood burning fireplaces of the older neighborhoods down the hill from me. Hay rides, bonfires, and trips to the apple orchards and pumpkin patches are always on my calendar.  And of course I can’t forget how everything becomes pumpkin jalapeno-popper-white-chili_2428flavored and scented and how kitchens begin smelling of warm spices from chili to cinnamon.  Or maybe I just like fall so much because I’m a fall baby.

Anyway, I definitely was not prepared for this sudden chill. My closet still full of summer clothes (I just returned from Florida to boot!), I thought a cardigan and closed toe pumps would suffice…until I stepped out into the 40° morning. Brrrr! At least no one looks at me funny now when I order my 185° lattes?

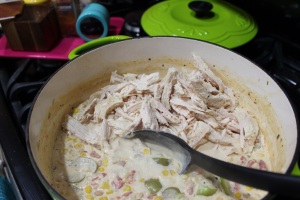
With the drop in temperature, it is no wonder I succumbed to fall’s siren call for a piping hot pot of chili. I went for a white chili for this first batch since I was craving something creamy. I actually created this recipe last year, making it for my former team-mates as a thank-you for the wonderful going away events (bowling and beer…they know I love being active) and presents they gave me (a Starbucks Verismo complete with pods and syrups…they know I love my lattes) before I transferred to my current office. Boy did it go fast!

jalapeno-popper-white-chili_2421It’ll probably disappear fast from your tables, too! It has all the right fall stuff after all: warm spices with just enough heat, soothing creaminess to offset the heat, and filling late summer and early fall veggies, most of which you can still find at the farmer’s market.

Aren’t you imagining curling up with a blanket or finding a seat by the fire with a bowl of this warm and comfy meal? I know I am!

jalapeno-popper-white-chili_2429

Jalapeño Popper White Chicken Chili

serves 6
Ingredients
  • 1 lb cooked chicken breast, shredded
  • 1 15-16 ounce can of Great Northern beans (or Cannelini)
  • 1 15-16 ounce can of sweet corn
  • 1 10 ounce can mild rotel style tomatoes
  • 1 cup yellow onion, diced
  • 1 dry pint, about 6 large, tomatillos quartered
  • 3 large jalapeños, diced finely and seeded
  • 2 tablespoons unsalted butter
  • 8 ounce package of light cream cheese
  • Homemade ranch dressing mix
    • 8 ounce envelope of powdered buttermilk
    • ½ teaspoon dried parsley
    • ¼ teaspoon onion power
    • ¼ teaspoon garlic powder
    • ½ teaspoon freeze dried chives
  • 1 cup low sodium chicken broth
  • Juice of half a lime
  • 1 teaspoon freshly chopped cilantro + more for garnish
  • Spices:
    • 1 teaspoon sea salt + a pinch
    • ¼ teaspoon freshly ground black pepper
    • ½ teaspoon cumin powder
    • ¼ teaspoon cayenne chili powder
    • ¼ teaspoon chipotle chili powder
Directions
  1. Heat a large, heavy pot (I use my Dutch oven) over medium heat and melt butter.  Once butter is melted add and saute onions and jalapenos until tender, about 5 minutes. Add a pinch of salt and cook for another 30 seconds.Jalapeno Popper White Chili_saute
  2. Pour broth into pan then add Great Northern Beans, sweet corn, rotel tomatoes, tomatillos, and all the spices into the pot.  Stir to mix.  Bring to a low boil, stirring occasionally.Jalapeno Popper White Chili_veggies in pot
  3. If making your own ranch dressing mix, while chili is coming to a boil blend all ingredients together in a medium bowl.Jalapeno Popper White Chili_ranch mix
  4. Once chili comes to a low boil, stir in ranch dressing mix until blended.
  5. Add cream cheese to the pot, stirring constantly to melt and blend into the chiliJalapeno Popper White Chili_cream cheese
  6. Once cream cheese has melted, add your spices to the pot, stirring to blend into the chili.Jalapeno Popper White Chili_spices
  7. Add the shredded chicken, lime juice, and cilantro.  Stir to mix and bring to a low boil again. Reduce heat to low and simmer chili for 10-15 minutes.Jalapeno Popper White Chili_shredded chicken
  8. Taste and add additional salt and pepper as desired.  If chili is too spicy, adding additional cream cheese or heavy cream will help. I recommend adding the additional dairy in one tablespoon increments.  If the chili is too acidic, add sugar in one teaspoon increments.Jalapeno Popper White Chili_simmering
  9. Serve with your favorite chili accompaniments such as tortilla chips, shredded cheese, sour cream, guacamole, crumbled bacon, etc.

Leftovers freeze very well!

Jalapeno Popper White Chili_2416

Key-lime Lavender Ice Cream

lavender-key-lime-icecream-2Well, last week the fall season began, the season of change, letting go, and a reminder that nothing is permanent. For myself, as I say good-bye to summer, I am also saying good-bye to a 10 year relationship that ended on a very bad note and letting go of the pain that has accompanied it.

For those that have been in long term relationships that have ended, you know that one of the most difficult things to overcome in the first few of months is everything that reminds you of your former significant other. Now, I’m a social scientist. From my sociology anthropologylavender-key-lime-icecream-1 background I know that everything has meaning, but only because we attach that meaning to it. That said, we can also remove and change those meanings, which is why I spent most of my summer exorcising demons from the places and things I had shared with Shawn over the past decade. Of course some things are more easily taken care of (i.e. burning pictures, donating left behind clothing), while others, like places, are harder (I’m probably the only person that hates Charleston, SC). I thought I had cleared them all out of the shadows until the other week.

dessert
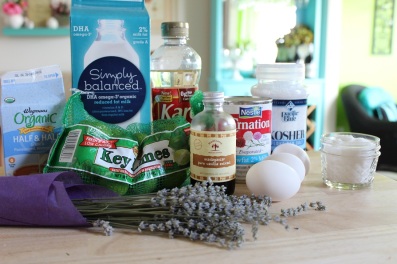
I had joined my family in Orlando and one non-Disney day, while my nieces napped, I was able to escape for a couple of hours. I found myself a nice restaurant, buying myself a tasty, light lunch and a fun flight of wine. Being on vacation, of course I said yes to dessert. When my server brought out a tray of tall shot glasses filled with sweet delights, I asked her for her recommendation.She told me the key lime pie trifle was her absolute favorite.

I visibly cringed.

I love key lime pie, and although Shawn was not the one that introduced me to it, he is the one that made it a regular occurrence in my life. (BTW, I went for the s’mores and chocolate peanut butter trifles.)

So this post is not only about saying good-bye to this sad, sunny summer, but also about letting the past go and reclaiming key lime pie.

Let me tell you, these poor key limes! I can’t tell you how hard I glared at them before key-limes
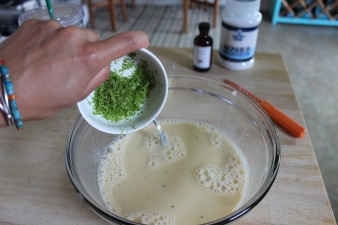
taking a deep breath and adding them to my shopping cart. Of course the limes hadn’t hurt me, Shawn had. They were just lil ol’ limes. I had to do something nice with them.

Instead of making a key lime pie, like the minis Shawn and I made for this post that recently popped up in my Facebook Memories, I decided to re-try a recipe I had written down two summers ago after Emilie and I had visited Seven Oaks Lavender Farm: a Key Lime and Lavender ice cream.

In my opinion, this is a very elegant ice cream with its lightly floral notes from the lavender and the bitter citrus of the key limes. For me, this take on key lime pie made me think of how much I have grown and changed over the past decade. After all, I made ice cream instead of slashing the tires of his brand new blue Ford F150 truck, right? Yes, I am a grown, refined woman who has no need to stoop that low. Instead I’ll keep doing what I’ve always done, and work to leave the world better than how I found it.

lavender-key-lime-icecream-3


Key-lime Lavender Ice Cream

Ingredients

lavender-key-lime-ingredients

• 1/2 cup 2% milk
• 1/2 cup half and half
• 1/2 cup sugar, divided, plus 1 tablespoon separated
• 2 tablespoons light corn syrup
• 1 12 ounce can evaporated, low fat milk
• 1 tablespoon vanilla extract
• 2 tablespoons dried, culinary lavender buds
• 3-4 egg yolks
• 1/3 cup fresh key lime juice, about 7 key limes (substitute Persian limes if preferred as key limes have a natural bitterness)
• 1 teaspoon key lime zest
• 1/2 cup crushed graham crackers
• Pinch of sea salt

Instructions

1. In a saucepan, combine whole milk, evaporated milk, 1/4 cup sugar, corn syrup, vanilla extract, lavender buds, and sea salt. Whisk to combine.
2. Add lavender buds to ice cream base. lavender-key-lime-adding-buds
3. Heat the milk mixture gently over medium heat to 180° Fahrenheit. Tiny bubbles will form around the edge, but do NOT bring to a boil. Remove from heat.
4. Set aside to cool for at least 10 minutes, allowing the lavender to steep and the ice cream base to cool.
5. While ice cream base is cooling, whisk egg yolks and remaining 1/4 cup sugar in a medium bowl. Set aside.
6. Place a mesh strainer over a large bowl.
7. Pour cooled ice cream base through the strainer, separating lavender buds from the base. Discard buds.lavender-key-lime-strain-buds
8. Very gradually add ice cream base into the egg mixture, whisking constantly to avoid cooking the eggs and causing the base to curdle. Retain strainer and bowl and set aside for later.lavender-key-lime-making-custard
9. Return entire mixture to the saucepan. Turn stove to medium heat.
10. Stirring constantly, continue cook the ice cream base until it reaches 160° Fahrenheit.
11. Strain the ice cream base again, pouring through the mesh strainer into a large bowl. Discard any remaining solids.
12. Add key lime zest to warm ice cream base and whisk together.lavender-key-lime-adding-zest
13. Cover ice cream base with plastic wrap, ensuring it touches the surface to prevent a skin forming.
14. Place covered bowl in the refrigerator and allow ice cream base to cool, about 20 minutes. lavender key lime covering.jpg
15. After ice cream base has cooled, add key lime juice and whisk to combine.lavender-key-lime-adding-lime-juice

Replace the following steps with the instructions that came with your particular ice cream maker.
1. Turn on the ice cream maker and carefully pour the ice cream base mixture into the frozen freezer bowl.lavender-key-lime-adding-base-to-churner
2. Allow the ice cream base to churn and thicken into a soft serve like, creamy texture, approximately 35-40 minutes.
3. Add crushed graham crackers to the ice cream base and churn an additional 5 minutes.lavender key lime adding graham crackers.jpg
4. Divide ice cream into freezer safe, air tight containers. Cover and freeze until ice cream is firm, about 3 hours.lavender-key-lime-finish-churn

Be sure to check out my Lighten Up the Churn recipe for other notes.


Romanesco Mediterranean Salad – Foodie Fun

Romanesco Salad 3Wow, now where did October go, friends?  Is it really November?  I can’t believe that I’ve been at the new job for a month already, or that I just finished my first graduate school mid-terms, or that my birthday twin is about to turn one year old (That would be my niece, Izzy-bear.  Yes, she was born on my birthday!).  What a packed year and how quickly its end approaches.  Alas, that also means the end to my local Farmer’s Market, which is about to shutdown for the winter.

I hate to admit that I ended up throwing away most of the produce I’d pick up each Sunday at the market (Told you it was a packed year!).  With mid-terms overRomanesco Head Close Up and finals not quite here yet, however, I now have a weekend or two to have some foodie fun and get my kitchen creativity on.  Yay!  Of course, as the weather is cooling down so are the in-season selections, but it also means those spring-time cool weather crops that I missed are making their second appearance like this little, difficult to find beauty: Romanesco.

I can’t believe I actually came across this lovely piece of natural art, but there it was: a bright green mound of fractal florets surrounded by colorful orange and purple cauliflower.  How could I resist?  It was like when I found those fiddle-head ferns.  I couldn’t wait to have some fun thinking up something fun and new.

Romanesco Head Close Up 2The first step, of course, was to taste the Romanesco.  From what I had read, I knew to expect some sort of cauliflower/broccoli blend.  Considering that it is also more often called Romanesco Broccoli than Romanesco Cauliflower, I was prepared for my taste buds to meet something along the metallic flavor I tend to get from broccoli.  To my surprise, I found Romanseco to have the sweeter profile of cauliflower, only nuttier, but still with the slight bite of broccoli.  If you are a cruciferous fan, I definitely recommend this veggie!

So what to do with the two heads of Romanesco I had purchased?  Since part of Romanesco Salad 2this vegetable’s appeal is it’s exotic appearance, I knew I wanted to maintain whole florets.  However, I didn’t want to just steam the Romanesco.  I mean, I was supposed to be having FUN.  So of course I turned to Emilie’s and my favorite cooking resource:  the Flavor Bible.

Now Romanesco is a bit too exotic to have its own entry in this tome, however now that I knew what it tasted like I flipped to the cauliflower entry and perused the suggested pairings…and at the top of the list, in bold type nonetheless, was…anchovies.

Huh.

Heck, why not? Time to stretch my kitchen skills after such a long hiatus, right? Right!

Romanesco Salad 1Continuing down the list, I determined  a simple, Mediterranean style dressing would be the perfect solution to show off these pretty florets both visually and flavor-wise.  And if I do say so myself,  this Romanesco salad turned out to be quite versatile. I ate it fresh (well, post photo-op) while it was warm, but throughout the week I found myself nibbling on the refrigerated leftovers.  This recipe is readily a main dish, a side dish, and a tapas and can be served warm, room-temperature, or cold. Not a bad deal, I say.

And it was definitely fun.

Mission accomplished!

Romanesco Mediterranean Salad

Ingredients

Romanesco Salad Ready for Assembly

  • 2 heads Romanesco Broccoli/Cauliflower
  • 3 tablespoons extra virgin olive oil
  • 1 tablespoon fresh lemon juice, about 1/2 a lemon
  • 2 garlic cloves, minced
  • 1/4 teaspoon anchovy paste
  • 2 tablespoons small capers
  • 1/4-1/2 teaspoon red pepper flakes
  • 1/4 cup whole wheat breadcrumbs
  • cooking spray
Directions
  1. In a small bowl, combine olive oil, lemon juice, garlic, and anchovy paste, whisking together until emulsified.  Set aside.Romanesco Salad Dressing
  2. Fill a saucepan with 3/4 to 1 inch of water and insert steamer basket and bring to a boil.  While waiting for the water to boil, prepare the Romanesco.
  3. With a paring knife, carefully cut florets from the Romanesco to preserve their unique fractal shape.
  4. Once the water comes to a boil, place the Romanesco florets into the steamer basket and cover.  Steam 3-5 minutes depending on desired tenderness. When finished transfer florets to a large bowl filled with cool water to stop the cooking process.  Drain and set aside.Romanesco Salad Steaming
  5. While Romanesco is steaming, spray a pan with cooking spray and heat over medium. Once pan is heated, toast breadcrumbs for about 2-3 minutes until golden. Remove from heat.
  6. In a large bowl, combine steamed florets, capers, and redpepper flakes.  Pour in the anchovy dressing and toss ingredients to coat.  Add toasted breadcrumbs and toss one more time to combine ingredients.Romanesco Salad Dressing Salad
  7. Serve at room temperature as tapas or a side dish.

Romanesco Salad 5

Hummingbird Cupcakes and a Tale of Two Crows That Led the Way

hummingbird cupcakes 1Today is All Souls Day, a holy day in the Roman Catholic, Eastern Orthodox, and Anglican churches that honor the dead.  My friends, I have been saving this recipe for over a year now, having been inspired to make these cupcakes from an event that occurred at my grandmother’s burial in May 2014.  I am thinking today is the perfect time to share these Hummingbird Cupcakes with you as we remember and pray for those who have gone before us.

IMG_9038 sm

Jack Jones, my 4th great grandfather and grandson of the patriot Stephen Jones of St. Mary’s County, Maryland.

As I shared with you almost a year ago now in my post, Grilled Salmon Cakes – Saying Good-bye to Grandmaafter my grandmother passed in February of last year the final remnants of winter prevented us from laying her to rest until the weather warmed and the snows melted away.  That May I finally got to see where my grandmother’s family had lived since the late 1700s when American settler’s began pressing westward out of Virginia and North Carolina.  Having roots that deep in South-eastern Kentucky, of course we have a family cemetery filled with generations of my grandmother’s family.  It is out of this cemetery that the story inspiring these Hummingbird Cupcakes came about.

My grandmother’s constant companion for years was my very free-spirited cousin, Shelley.   Of course I was not surprised when my dad’s middle sister  checked in with my dad the evening we arrived in Kentucky and announced that Shelley had set up camp in the graveyard and would not be joining us for dinner. (That of course had my mother worried!)

hummingbird cupcakes 6The next morning after the family caravan wound through back-roads, passing house after house (and trailer after trailer) upon which I read  names familiar from my grandparents’ family trees, we found our way to where my grandfather was waiting for my grandmother under the eves of what  is now the Daniel Boone National Forest.  Shelley stood in front of a shelter  at the top of the dirt road waving at us, barefoot and smiling.  She had a story to share.

Her story began with two crows and ended in a place we thought was lost forever.

The previous evening, after my aunt had dropped her niece off, Shelley was communing with the silence , the trees, and the graves surrounding her when a pair of crows began cawing at her.  Shelley just drank her wine and eventually hummingbird cupcakes 7drifted off to sleep despite her noisy, uninvited companions.  In the morning, those two crows were still there and cawing at her when one suddenly spread it’s wings and flew away.  Shelley relayed that she had felt the need to follow it and so she did, chasing it down the dirt road and out of the cemetery. It came to rest at a small farm down the road where an astonished man was just coming out of his trailer when he saw Shelley come out of nowhere.

Turns out this man and the folks living in the neighboring trailers were distant cousins on my grandfather’s side…not completely surprising as we knew my grandfather’s parents had owned much of the surrounding land and had bequeathed it among a dozen sons and a daughter (never mind that my grandfather’s father was one of nearly 30 children).  Shelley was ecstatic. “Do you know about Barbecue Cliff???” she asked excitedly.

Hicks BBQ Cliff 3

Walking along a stone cropping along the path to Barbecue Cliff

Barbecue Cliff was a place our grandmother had spoken about often during the years of their companionship.  It was a huge gathering place for family shindigs (and I’m sure revivals as my grandmother was descended from generations of Baptist ministers).  Shelley had heard many stories about it from Grandma…but her mother, my dad, and my other aunt did not know its location. When Grandma passed, Shelley feared it was lost to our branch of the family forever.

Of course the man knew about Barbecue Cliff! He pointed over beyond the farm to the trees and hills behind and offered to show her.

“We can all go together and see it after we bury Grandma,” Shelley finished.  The woman who had owned the land previously had left a caveat in her will…no member of the entire clan could be denied access to the area.  We were all welcome.

Hawk Creek Exploring Stones

Exploring family history with my cousins.

I wanted to ask Shelly if she thought Grandma had sent the crows to show her the way…but I knew what her answer would have been.  “Of course!”

So now you know the story of the two crows.

Time for the cupcakes!

Now how did crows inspire these, you might ask.  Well they’re birds, right? LOL!  Anyway, besides the avian influence, I was also inspired by the fact that Hummingbird cake is a Southern favorite and my grandmother was a Kentuckian through and through.  Who would have thought  these pretty treats had started out with a pair of crows, huh?hummingbird cupcakes 2

Hummingbird Cupcakes

makes 2 dozen cupcakes
Ingredients
Dry Ingredients
  • 1 cup white whole wheat flour
  • 1 cup all purpose flour
  • 1 teaspoon baking soda
  • 1/2 teaspoon salt
  • 1 teaspoon cinnamon
  • 1/2 teaspoon all spice
  • 1/2 teaspoon nutmeg
  • 1/2 teaspoon ground ginger
  • 1/2 cup pecans, toasted and chopped
Wet Ingredients
  • 3-4 large, very ripe bananas, mashed
  • 1 cup crushed pineapple, juices drained
  • 3/4 cup dried, shredded coconut, preferably unsweetened
  • 1/2 cup (4 fluid ounces) olive oil
  • 1 1/3 cup granulated sugar
  • 2 eggs
  • 1 teaspoon vanilla extract
Cream Cheese Frosting –

Garnish options: shredded dried coconut, shaved dried coconut, whole or half pecans

Directions
  1. Pre-heat overn to 350 degrees Farenheit.  Line two standard muffin tins with your desired liners and set aside.
  2. In a medium bowl, whisk together the flours, baking soda, salt, and spices. Set aside.hummingbird cupcakes dry ingredients
  3. In a large bowl, add the sugar and vanilla.  With an electric mixer on medium, begin streaming the olive oil into the bowl.  Continue beating the oil, sugar, and vanilla until combined.
  4. Add eggs one at a time to the sugar mixture.  Scrape down the sides of the bowl as needed and beat mixture until it reaches a smooth, thin custard-like consistency.   Turn mixer off.hummingbird cupcakes oil sugar eggs
  5. Add the mashed bananas and crushed pineapple to the egg and sugar mixture. Turn the mixer on to medium-speed and beat until ingredients are combined.hummingbird cupcakes combining wet ingredients
  6. Turn mixer down to low speed and begin to gradually add the flour mixture to the wet ingredients. Do not over-beat or the cupcakes will be tough.  If preferred, fold the flour in with a rubber spatula instead of using the mixer.hummingbird cupcakes adding dry ingredients
  7. Fold chopped pecans into the batter.hummingbird cupcakes fold pecans
  8. Divide batter evenly among the lined cups.  Begin with approximately 1/4 cup of batter in each.hummingbird cupcakes filling liners
  9. Place muffin tins in oven and bake 20-25 minutes.  When finished, cupcakes will be golden brown and a toothpick inserted into their center will come out clean.hummingbird cupcakes cooling
  10. Cool completely on wire racks before topping cupcakes off with Cooked Cream Cheese Frosting.hummingbird cupcakes icing
  11. Decorate as desired with shredded dried coconut, shaved dried coconut, whole or half pecans.

hummingbird cupcakes 4

Venison Stroganoff – Beating Off the Last of Winter’s Chill

Venison Stroganoff 5Is it just me, or is Spring the biggest tease of all the seasons?  I don’t know how the weather looks in your neck of the woods, but here in the D.C. area a day or two of beautiful, sunshine-y, warmish days are followed by sometimes 20 degree drops in temperature with rains and crazy winds.  For example, just a week ago I went for a lovely seven mile run in shorts and a tank-top.  That evening I packed up my winter sweaters…only to pull one out the next morning to shield myself from the wintry chill that arrived overnight.  Brrrrr!  On these early days of spring, when a shiver or two lingers in the air, we can find ourselves still craving a bowl of something warm and comforting.  However,  by this time I am chili and stew tired out.  Time for something new, right? Now last we spoke, I promised to share my new experiences with you.  Well, to break out of the season transition doldrums, I ventured into the “new” territory of…venison!

It is no surprise that I work with a number of hunters and overall outdoors men Venison Stroganoff 1(and women); it’s the military after all.  Monday mornings during hunting season, I’d often hear of  miserable hours of sitting in cold drizzle with no game, see video clips of foraging bears, and lend an ear to the venting of the bad “etiquette” of late-starting hunters scoping out for spots and scaring away the deer.  As the weeks passed on, it  appeared to me that this past season was un-plentiful.  It wasn’t until nearly the very end that one of my friends stopped by super excited to share his catch (as promised) and presented me with a neatly butcher wrapped package of  venison chops.  The catch to the promise, of course, was to share what I thought about my first experience with venison.

Venison Stroganoff_prepping chopsI followed my friend’s recommendation to prepare a small piece of venison in order to just taste the flavor of the meat itself.  “Just a bit of olive oil, salt, and pepper, ” he said, “sear it in a pan then finish it in the oven like you would a nice steak.” Roger that!  Upon opening the package that weekend, I noticed the deep, rich color of the meat.  Meat doesn’t look that nice even from the higher end grocery stores!  I added checking out the downtown butcher shop to my to-do list so that I could make a comparison some day.   Then I removed a piece of venison from the package, froze the rest for later, and followed my friend’s recommended preparation.  Below is how it turned out.  Now doesn’t that look tasty?

Venison Stroganoff_ready to taste Venison Stroganoff_ready to taste 2

My first thoughts as I chewed that initial bite of venison was, “What’s this “gamey” flavor everyone keeps talking about?”  To me, the venison tasted almost identical to beef, albeit drier and a bit tougher than a piece of beef prepared in the same manner.   My second bite, I took it slower.  I went ahead and chewed and chewed allowing every bit of my mouth to have contact with the venison as I tried to discern that distinct flavor.  Still, I did not notice much of a difference, only this time I did discover a mild, earthy after-taste that reminded me of mushrooms.

Venison Stroganoff 3That slight earthiness of the venison inspired me to use the remaining meat in a Stroganoff, a creamy dish of sauteed beef and mushrooms simmered in sour-cream.  I’d been dying to make some for the longest time (I grew up on Hamburger Helper’s Potato Stroganoff!).  The venison and the incoming spring provided me the perfect excuse and opportunity to bust out of that muddy spring rut I mentioned earlier.  To fight the lingering chill, the venison Stroganoff provided warm and creamy comfort without the heaviness of a fall or winter stews,  while the earthy notes of from the venison and mushrooms gave hint to the coming freshness of spring.

Now c’mon already Spring.  We’re ready for you!

Venison Stroganoff

Ingredients

Venison Stroganoff_packaged chops 1

  • 1 pound venison
  • 6 ounce package cremini mushrooms, sliced
  • 2 shallots, sliced
  • 2 cloves garlic, minced
  • 4 tablespoons butter, divided in half
  • 1 tablespoon olive oil
  • ¾ cup beef or chicken stock
  • 1 large bay leave
  • 1 teaspoon whole grain mustard
  • 1 cup full fat sour-cream
  • 1 tablespoon chopped parsley, plus more for garnish
  • salt and pepper to taste
  • Cooked rice or egg noodles
Directions
  1. Pat venison dry with paper towels and season with salt and pepper. Set aside.Venison Stroganoff_pat salt pepper
  2. Melt 3 tablespoons of butter in a large pan over medium-high heat.
  3. Sear venison in pan.  Use Emilie’s guide to cook venison to desired doneness. Remove venison from pan, setting aside to rest.
     Venison Stroganoff_butter sear      Venison Stroganoff_remove venison
  4. Reduce heat to medium and melt remaining butter in pan and pour in olive oil.  Add shallots and mushrooms, slowly sauteing until soft, about 7-10 minutes.Venison Stroganoff_shallots and mushrooms
  5. Add minced garlic to the mushrooms and cook one minute more.
  6. Pour in stock and add mustard and bay leaf to pan.  Stir, scraping up any bits left over from searing the venison.Venison Stroganoff_mustard and bayleaf
  7. Raise heat back to medium-high and bring to a boil, then reduce heat to low and allow the sauce to simmer 5 minutes.
  8. While sauce simmers, slice the venison.Venison Stroganoff_slice venison
  9. Stir sour-cream into the mushroom sauce and let sauce warm through.  Be careful not to let the sauce come to a boil or the sour-cream may break.Venison Stroganoff_add sour cream
  10. Fold in venison and parsley and remove from heat.
    Venison Stroganoff_fold venison into sour cream  Venison Stroganoff_ready to serve
  11. Serve Venison Stroganoff over rice or egg noodles.Venison Stroganoff 4

Homemade Maple Coconut Almond Butter – New Year, New Beginnings

Maple Coconut Almond Butter 2Well now, how has everyone’s 2015 so far? I hope it’s been fantastic, because I have never been more excited for a new year in my life.  Why, you might ask? Well, because for the first time ever I am allowing myself to be exited about it. Rather than dread another year and what it could possibly throw at me this time, I am going to be open and receptive to all the new beginnings it might hold for me.  Want to ride along?

Now I can’t share every new beginning with you.  After all, Cork and Spoon is a food and drink blog.  Soooo, you may not see my latest jewelry pieces, hear my current running play-list, or see my newborn niece’s photo-shoot, but you will see any tummy yummy goodies inspired by those experiences. Just to warn you, though, all experiences are fair game: good or bad.  After all, they both teach us something.  My own bad experiences over the past two years have taught me that creativity has healing powers, that it can be the spark that ignites the flame which lights the way out of the darkest pit.

In conjunction with honoring my creative side, another spark for me has been myMaple Coconut Almond Butter 3 running.  As you may recall, I completed my first race (a half-marathon!) last spring.  Well, I’m training for my next one, which is just over a month away.  Besides the various runs and exercises loaded up in a runner’s training plan, another important piece is the “fuel plan” as I call it: how you plan to fuel your training and your run.  For example, once you start getting into Long Runs, meaning a run that lasts longer than an hour, you not only need to make sure the tank’s full when you start, but you’re going to have to re-fuel mid run.  It’s better to learn what works with your body during training rather than find out on race day that coffee gives your the runs or a certain gel gives you heartburn. Needless to say, it’s a pretty good idea to incorporate your race day breakfast and any pre-race snacks and hydration into your training plan.  For me, my race day and Long Run day breakfast has become a bagel (preferably the latest Thomas’ Bagel limited edition flavor) and creamy almond butter.

Maple Coconut Almond Butter 4Mmmmmm, almond butter.  I mean, I love peanut butter, too, but after making the switch I don’t think I’ll go back except as  a treat (Reeses anyone?).  Mostly, I do prefer the flavor, but nutritionally almond butter has just a little bit of a leg up over peanut butter, especially for runners, athletes, and other highly active people.  In addition to having significantly greater levels of the anti-oxidant Vitamin E, almond butter also provides magnesium (supports muscle functions and energy production…and is said to help migraines!) as well as iron (necessary for producing hemoglobin and myoglobin, which are essential for the carrying of oxygen the body). Not to mention almonds are going to be easier on your body on race day. Almonds are actual nuts, while peanuts are legumes…you know…like beans…yeah, chili will not be anywhere on my plate until after the race.  Did I mention my next half marathon is in Texas??

Now what really  bites is that almond butter is typically, at it’s cheapest, twice Maple Coconut Almond Butter 5the cost of peanut butter.  That’s why when my beautiful chartreuse Blendtec (a birthday present to myself) arrived a couple of weeks ago, I already had homemade almond butter on my “to-make” list. Since my favorite almond butter is Justin’s Maple Almond Butter, I decided I wanted to make something similar and it would be a great way to use my maple sugar, which I don’t get to use very often (It’s pricey, so I use it for special recipes).  I also decided to use coconut oil instead of grapeseed oil for two reasons. First, it added a little sweetness without more sugar. Second, it’s winter.

Who in the northern hemisphere isn’t craving a warm beach right now? Lol!

Happy New Year, friends!

Homemade Maple Coconut Almond Butter

Makes appx. 7 ounces (0.875 cups)

IngredientsAlmond Butter Ingredients

  • 1 ½ cups raw almonds
  • 4 tablespoons maple sugar
  • ¼ teaspoon sea salt (fine not coarse)
  • 1 tablespoon coconut oil (melted for better results, but room temperature is fine).
  • 1 teaspoon maple syrup (optional)

Tip: To adjust for increased creaminess, add mild flavored oil, such as canola or grapeseed, beginning with 1 teaspoon and increasing until blended almond butter reaches desired creaminess.

Directions

  1. Pre-heat oven to 170°F.
  2. Spread almonds evenly on a parchment lined, rimmed baking sheet. Bake 20-25 minutes, tossing almonds halfway through for even roasting. If needed, allow almonds to cool enough for handling, but make sure they are still warm.
  3. Pour warm almonds into your mixer jar or food processor bowl.
  4. Pulse almonds until pulverized into almond meal. Almond Butter PulseNote: Professional grade blenders such as Vitamixes and Blendtecs don’t really need this step, but for less powerful appliances, better safe than blowing out your motor. 
  5. Starting on a low speed and blend almond meal for 15 seconds.
  6. Increase to a high speed for 30-60 seconds, or until you hear the blade moving freely,i.e. your almond butter is stuck to the sides of the jar/bowl and no longer getting pulverized by the blade.
  7. Stop blender or food processor and use a rubber spatula to scrape the almond butter back into center of jar/bowl.
  8. Add coconut oil once the almond meals begins to form a paste.
  9. Repeat the blend then scrape cycle until almond butter begins to flow freely over the blades.  Note: Your appliance’s motor should sound low, as if it’s working to churn that sticky butter. Remember to keep a watch on your appliance’s motor. If the machine gets too warm, stop the process and allow the motor to cool down.
  10. Add maple sugar and salt to the almond butter,  as well as maple syrup  and any additional oil for creaminess if using these options.
  11. Blend 30-60 seconds on high.  Repeat as necessary to reach desired creaminess.
  12. Refrigerate almond butter in an airtight container for up to two weeks.

Almond Butter Almond Meal   Almond Butter PasteAlmond Butter Almost Ready  Almond Butter Ready

Maple Coconut Almond Butter 1

Onion Cheddar Beer Bread

One of the hardest parts about moving halfway across the country is making new friends in a strange city. Luckily, the Internet makes it relatively easy to find social groups, volunteer organizations, and more. Within a few weeks of moving to Austin, I started exploring the Austin MeetUp website, where I found several local women’s social groups that appeared to be filled with people I could definitely get along with. Through events these groups have sponsored, I’ve been able to explore Austin while meeting lots of funny, smart, and awesome people who have the potential to become a great group of friends.

Onion Cheddar Bread - cookie swap table

Setting the table before the guests arrive.

I’ve begun to enjoy the people in one group in particular over the past few weeks and wanted to give back by hosting my own MeetUp event for ladies in the group. I decided to host a small Christmas cookie swap for those who were interested as a chance to hang out while also getting a fun collection of holiday treats to enjoy over the coming weeks. As the host, I wanted to make sure I had some salty snacks to compliment the sweets we’d be sampling as well as a little mulled wine for everyone. With so much already on my to do list, I needed make a swap treat that had minimal steps and took little time to bake. Spending hours preparing baking sheet after sheet of cookies seemed like too daunting a task when the floor still needed to be mopped.

Onion Cheddar Bread - finished onion cheese bread

The clear choice for my dilemma was mini-loaves of quick bread. With 3 loaves of bread baked per recipe batch, it would be easy to quadruple the recipe and make the required 12 loaves of bread for the ladies to take home aftewards. I even had 12 cardboard mini loaf pans in the closet waiting to be used! It was fate. A few test runs later, I perfected this super easy, 9-ingredient, savory quick bread. It is perfect with a little butter  or cream cheese served on the side of a smooth tomato soup.

Onion Cheddar Beer Bread
(1) 9-inch loaf bread or (3) mini 4-inch loaves

1 large yellow onion, diced
2 tablespoons olive oil
5 ounces white cheddar cheese
2 cups all-purpose flour
1 cup whole wheat flour
1 tablespoon baking powder
1 ½ teaspoons kosher salt
1 teaspoon sugar
12 ounce bottle nut brown ale or porter

1)     Preheat oven to 375ºF. Grease and flour a 9-inch loaf pan or 3 mini 4-inch loaf pans.

2)     Add olive oil to large heavy bottomed skillet over low-medium heat. Add diced onion and cook slowly to caramelize. While the onion is cooking, shred or roughly chop the cheddar cheese. When the onion has just begun to caramelize, about 10 minutes, remove from heat and let cool so that it doesn’t melt the cheese.

Onion Cheddar Bread - cook the onions

3)     Whisk together flours, baking powder, salt, and sugar. Stir in onions and cheddar until evenly distributed.

Onion Cheddar Bread - whisk dry ingredients

Onion Cheddar Bread - add chredded cheese

Onion Cheddar Bread - stir in onions

4)     Slowly add beer, stirring to fully combine. The final batter will be thick and you will need to spoon it into baking dish. Bake for 50 minutes for a large loaf or 30 minutes for smaller loafs. Remove from oven and cool completely before storing, airtight, in the fridge.

Onion Cheddar Bread - add the beer

Onion Cheddar Bread - add the beer 1

Onion Cheddar Bread - add the beer 2

Roasted Garlic Jelly for Foodie Fun

Garlic Jelly Jar 1It’s the holidays and we are down to less than one week until Christmas Day. Yikes! If you are anything like me, you probably either a) have not started on your gift list (not me this year, yay!) or b) are stressing over those last few gifts…you know, for the folks that have all they [think] they want sans the winning multi-million dollar lottery ticket.  My office buddy and I are kind of in that last boat together  this year.  What to get for those last few names still on our lists while simultaneously trying to overcome the dread of having to brave the frantic shopping town centers.  Enter the realm of Do It Yourself (DIY)! Now don’t panic if you are thinking about how empty the craft store shelves are by now, because you likely won’t need anything too seasonal for this idea…because you’ll be doing most of your shopping at the grocery store!

A fun, food themed gift basket or goodie bag is always a hit with my circle of friends. You may recall the Vanilla Salt I shared with you two years ago. That yearGarlic Jelly Cheese Bread 2 I also made Thai-Chili Sugar, and Mulling Spice packets. Last year I made the delicious Roasted Garlic Jelly I am sharing with you today. This year…well I can’t quite tell you the exact details since some of the receivers are reading this…but it involves some fun baskets. For example one friend, who recently moved her family in with her new honey’s family, is going to get a package of family friendly fun things they can make with the kiddos. Another is getting complimentary recipes and pre-made mixes to go with items I bought her off of her Christmas wish list. My dad is getting a basket of NCIS DVDs tucked alongside jars of homemade pop-corn seasoning, cute popcorn themed bowls, and popcorn kernels.

Feeling less panicked now?

So back to this Roasted Garlic Jelly.

Garlic Jelly Cheese Tray 2Almost everyone makes this face when I say “garlic jelly”.  I think Emilie is the only one that didn’t raise an eyebrow.  Yes, yes, it sounds weird, but trust me this stuff is quite delicious. Have you ever had a clove of roasted garlic? Don’t you remember how it’s pungent flavor mellowed out and took on some caramelized sweetness?  I think you see where I am going with this now. Roasted garlic jelly is different, but it’s still a sweet jelly with just the faintest bit of tang (that would be the vinegar) and aroma of delicious, roasted garlic. This juxtaposition is precisely what will make this such a fun gift for your friends and family.

Merry Christmas, everyone!

Roasted Garlic Jelly

Fills 6-8, 4 ounce jelly jars. Recipe from Ball Complete Book of Home Preserving.

Ingredients:

  • 3  heads garlic
  • 1 tablespoon olive oil
  • 1 tablespoon balsamic vinegar
  • 1 cup dry white wine
  • 2/3 cup water
  • 1/2 cup white balsamic vinegar
  • 1 teaspoon whole black peppercorns, crushed
  • 3 tablespoons lemon juice
  • 3 cups granulated sugar
  • 6 ounces pouches liquid pectin (typically two packages)

Directions:

  1. Pre-heat oven to 375 degrees Farenheit.
  2. Slice off the tops of  the garlic heads to expose the cloves. Place each head on a small square of aluminum foil.Garlic Jelly Expose Cloves
  3. Over each head, pour olive oil and balsamic vinegar, approximately a tablespoon each per garlic head.Garlic Jelly balsamic
  4. Wrap the foil squares loosely around the garlic heads and roast in oven for 45 minutes.
  5. Let garlic heads sit until  cool enough to handle. Unwrap from foil and  squeeze each head to push out the softened cloves  into a medium saucepan. Discard skins.
    Garlic Jelly roasted garlic heads     Garlic Jelly roasted garlic cloves
  6. In a the same pan, add the wine, water, white balsamic vinegar and peppercorns to the roasted garlic.  Over medium heat (gentle now!) bring to a boil, then reduce heat and allow to boil gently for 5 minutes.Garlic Jelly Making Garlic Juice
  7. Cover sauce pan and remove from heat. Let the mixture steep for 15 minutes.
  8. Line a mesh strainer with several layers of cheesecloth or a large,  dampened coffee filter.  Place strainer over a deep bowl.
    Garlic Jelly Strain Garlic Juice 1            Garlic Jelly Strain Garlic Juice 2
  9. Pour garlic mixture through the lined strainer into the bowl.  Let drip, undisturbed, for about 30 minutes.  You should end up with about 1 2/3 cups garlic juice. If you end up with less, add up to 1/4 cup dry wine or water.
  10. As garlic “juice” is draining,  prepare canner, jars, and lids by bringing a large pot of water to a boil and boiling your jars and lids for 10 minutes. Turn off heat, but keep jars in hot water until ready to jar for up to an hour. Any longer and you will need to re-sterilize.Green Tomato Preserves Sanitzing Jars
  11. Transfer garlic juice to a large saucepan and stir in lemon juice and sugar.Garlic Jelly adding sugar
  12. Over high heat, stirring constantly, bring to a full rolling boil.
  13. Stir in pectin and return to a boil. Boil hard, stirring constantly, for 1 minute then remove from heat and quickly skim off foam.
    Garlic Jelly adding liquid pectin    Garlic Jelly skimming
  14. Quickly pour hot jelly into hot jars, leaving 1/4 inch headspace. (This jelly sets quickly!)
  15. Wipe rim. Center lid on jar. Screw band down until resistance is met, then increase to fingertip tight.
  16. Place jars in canner, ensuring they are completely covered with water. Bring to a boil and process for 10 minutes.Garlic Jelly hot water bath
  17. Once processed, remove from  canner.  As they cool, you’ll hear the lids “pop” as the jars seal.  To test whether the jar has sealed, press your finger against the middle of the lid.  If it springs up, it has not sealed.
  18.  Allow the jars to cool before storing.

Serving suggestions:

  • Serve as a cheese and fruit tray condiment
  • Use as a savory/sweet glaze on pork or chicken
  • Stir a tablespoon or two into risotto
  • Spread on toast (with bacon!)

Garlic Jelly Cheese Tray

Cooked Cream Cheese Frosting – The Best Way to That Tangy Cream Cheese Flavor

Cooked Cream Cheese Frosting 1

‘Tis the season for cream cheese frosting!  No, scratch that. Cream cheese frosting is in season all year ’round. However, once we begin donning our sweaters and coats as the holiday season goes into full swing, so too begins the season of never ending, delicious baked goods fresh from our piping hot ovens that we devour without abandon until the dawn of New Year’s Day. Who hasn’t salivated over a cream cheese stuffed pumpkin muffin or a wonderfully spicy slice of gingerbread loaf topped with cream cheese frosting? Not to mention perennial favorites also slathered in tangy cream cheese deliciousness, such as Red Velvet, Carrot, and (one of my favorites) Hummingbird cake. Yes, let the baking bonanza begin!

The very first frosting I ever made from scratch was cream cheese frosting. Cooked Cream Cheese Frosting 5 You’ve heard me tell you before how, growing up, food came out of a box, can, or jar.  Imagine my surprise as I watched a bar of softened cream cheese and a bag of powdered sugar whip up into a creamy, rich frosting for our (box mix) Christmas gingerbread loaf.  My sister and I were totally fascinated.  Now that I think about it, that was probably that point when I was bitten by the cooking bug.  No longer would frozen chicken nuggets, mashed potatoes from a box…or a tub of frosting…suffice.

Since that long ago Christmas, I’ve come to desire more than just the taste of sugar.  I think that just happens as you grow older (For example, I can’t bare the Cooked Cream Cheese Frosting 6sweetness of milk chocolate anymore. It literally hurts my teeth lol). You may have noticed from some of my cupcake posts that I shy away from American style buttercream, which is based on powdered sugar for structure.  Instead, I often go for Italian or Swiss style buttercream, which utilize meringued egg whites and less sugar.  Oh, the lovely layers of flavor! That’s why when I came across cooked cream cheese frosting in my research for a cupcake inspired by an experience at my grandmother’s grave site (not as morbid as it sounds, I promise) I had to share it with you all.

If you are a cream cheese frosting fan, I promise you will adore the frosting you get out of this technique.  It preserves so much more of that distinctive tangy flavor, plus that luscious creaminess.  Excited yet? I hope so!

Happy holidays, everyone!

Cooked Cream Cheese Frosting 4

Cooked Cream Cheese Frosting

Ingredients

Cooked Cream Cheese Frosting_Ingredients

  • 16 ounces cream cheese at room temperature
  • 1/4 cup all purpose flour
  • 1 cup sugar
  • 2 tablespoons cornstarch
  • pinch of salt
  • 1 cup milk
  • 1/2 cup (1 stick) of butter, room temperature
  • 1 teaspoon vanilla extract
  • optional: 1/4 cup powdered sugar

Directions

  1. In a medium saucepan, whisk to combine the flour, sugar, cornstarch, and salt.Cooked Cream Cheese Frosting_sugar and flour
  2. Whisk milk into the flour mixture.Cooked Cream Cheese Frosting_adding milk
  3. Place saucepan over medium heat. Continue to whisk flour mixture to create a smooth paste.Cooked Cream Cheese Frosting_paste
  4. Bring flour mixture to a gentle simmer. Continue stirring.  Allow to cook until a thick, sticky pudding like consistency is met. Do not leave the stove during this time; the sugar will quickly burn. (Lesson learned: a little caramelization is salvageable).Cooked Cream Cheese Frosting_paste simmering
  5. Scrape flour mixture into the bowl of a stand mixer, or into a large bowl if using a hand mixer.Cooked Cream Cheese Frosting_paste into mixer
  6. Whip on high for about 10 minutes or until the cooked flour mixture has cooled. (Warning: if the flour mixture is too warm, the final frosting may turn out too soft to hold its shape. Read about the Battle of Buttercream Hill here.)
  7. Lower mixer speed to medium high and add vanilla extract.
  8. Add butter, whipping until incorporated.Cooked Cream Cheese Frosting_add butter
  9. Whip in the softened cream cheese one bar at a time.Cooked Cream Cheese Frosting_adding creamed cheese
  10. Return mixer speed to high and whip frosting until thick and fluffy.  If frosting is too soft, add the optional 1/4 cup of powdered sugar to give the frosting more structure.
    Cooked Cream Cheese Frosting_whipped frosting Cooked Cream Cheese Frosting_powdered sugar for structure
  11. Chill before use for easier work-ability. The frosting will keep its shape at room temperature, but its definitely more messy to work with!Cooked Cream Cheese Frosting 2 Cooked Cream Cheese Frosting 3


Creamy Garlic Jalapeño Sauce

Nothing causes me more dread than going to the DMV in a new state to change my car registration and driver’s license. I’ve only done it 3 times, but I hate it so much I once waited until my previous registration had expired and I got a ticket before finally making the trip. I’d rather go to the dentist than the DMV any day of the week. Here in Texas though, that feeling of dread only doubled because instead of going to the DMV, you have to go to the County Tax Assessors and the Department of Public Safety. Who created this ridiculous process of needing to visit 2 agencies to finalize residnecy, made all the more difficult when neither is open on the after 5pm or on the weekend?! How does the state expect a new resident, who probably has no vacation time yet, to get your car registered within 30 days when they can only go during work hours! Clearly, this was not a task I was looking forward to completing.

Lucky for me, my new company’s leave policies are pretty generous, and I was able to use a vacation day within a month of starting. So I took Friday off, woke up at 6, and was in line at the County Tax Assessor’s  office 10 minutes before it opened – sans coffee or breakfast. Despite the byzantine process required for residency, I was in and out of both offices by 8:30, under an hour. I was amazed at the speed and efficiency of the individuals who helped me. Pleasantly surprised, I decided to celebrate my success, and fill my growling tummy, with breakfast tacos – like the real Austinite I had just become.

I stopped at Taco Deli on the way home and ordered the Otto and the Jess Special tacos. While waiting, I collected several salsas from the bar, including something they called Doña sauce, a bright green creamy sauce. Back at home, I liberally spread the jalepeño-based sauce on my taco, took a bite, and added more sauce. This stuff was amazing, addictive even, and I knew I needed to put it on everything in site. I only had a small container full, and needed to figure out how to get more. Raiding Taco Deli seemed ill advised, so I clearly needed to recreate it at home.

The sauce is a deceptively simple combination of  jalepeños and garlic, oil, and salt and pepper. Similar recipes boiled the peppers and left the garlic raw, but I was nervous about the over powering flavor of raw garlic, so I decided to roast the them together and pureed them until smooth- although next time I might try smoking them with mesquite wood for a deeper flavor. It’s an easy, straight-forward recipe that leaves plenty of room for additional creativity for those so inclined.

Jalepeno Cream Sauce - cream sauce on tacos one

Creamy Garlic Jalapeño Sauce

1 pound jalapeños
2 heads of garlic
⅓ cup virgin olive oil
salt & pepper

1)     Place a large cast iron pan or griddle in the oven and pre-heat to 325ºF. While the oven pre-heats, separate the garlic, leaving the thin papery cover on the cloves. You’ll need about 12 large and x-large cloves of garlic. Any cloves that are too small will burn and be unusable.

2)     Toss the garlic cloves and jalapeños with a drizzle of olive oil and put in the oven on the pre-heated cast iron. Roast for about 40-45 minutes until the garlic and jalapeños are soft. Stir at ⅓ and ⅔ of the way through.

Jalepeno Cream Sauce - place the peppers & garlic in a pan

Jalepeno Cream Sauce - stir half way through roasting

3)     Once the garlic and jalapeños have finished roasting, place them into plastic container or plastic bag and seal tightly. Let sit for 15-20 minutes, until everything is cool enough to handle.

Jalepeno Cream Sauce - finished roasting

4)     Carefully remove the skin from the jalapeños. Slice the skinless jalapeño open and scrape out the seeds. Toss the seeded and skinned jalapeños into a blender or food processor with the peeled roasted garlic cloves.

Jalepeno Cream Sauce - puree garlic and peppers

5)     Turn on the blender on puree and slowly drizzle the oil into the blender, add about a 1½ teaspoons of salt and a teaspoon of black pepper and blend for an addition 30 seconds.

Jalepeno Cream Sauce - season with salt and pepper

6)      Once the sauce is complete, you can store it in the fridge in a squeeze bottle for months – if you don’t finish it first. It is wonderful on fried avocados, baked salmon, nachos, and – of course – tacos, like Ruth’s shrimp tacos. Shake vigorously between uses, as minor separation may occur.

Jalepeno Cream Sauce - store in a squeeze bottle in the fridge

Jalepeno Cream Sauce - cream sauce on tacos 2